We have prepared a simple tutorial on how to install the Apache web server with PHP-FPM in Raspbian. It takes a few minutes to prepare Raspberry Pi to launch your website.
1. Add a "non-free" component to /etc/apt/sources.list, if not already there and add deb-src source
root@raspberrypi:~# cat /etc/apt/sources.list
deb http://mirrordirector.raspbian.org/raspbian/ wheezy main contrib non-free rpi

root@raspberrypi:~# cat >> /etc/apt.sources.list
deb-src http://mirrordirector.raspbian.org/raspbian/ wheezy main contrib non-free rpi
^C

root@raspberrypi:~# cat /etc/apt/sources.list
deb http://mirrordirector.raspbian.org/raspbian/ wheezy main contrib non-free rpi
deb-src http://mirrordirector.raspbian.org/raspbian/ wheezy main contrib non-free rpi
2. Update/upgrade and a good habit is to install the time synchronization and postfix
root@raspberrypi:~# apt-get update && apt-get -y upgrade
root@raspberrypi:~# apt-get install postfix ntp ntpdate
3. Install Apache, php-fpm and other packages according to your needs
root@raspberrypi:~# apt-get install apache2-mpm-worker php5-fpm php-apc
4. Install all dependencies for libapache-mod-fastcgi
root@raspberrypi:~# apt-get install debhelper dpatch libtool cdbs libapr1-dev apache2-threaded-dev
5. Install libapache-mod-fastcgi from source
root@raspberrypi:~# apt-get -b source libapache-mod-fastcgi
root@raspberrypi:~# dpkg -i libapache2-mod-fastcgi*.deb
6. Enable mods rewrite, actions etc. and restart apache
root@raspberrypi:~# a2enmod rewrite ssl actions include
root@raspberrypi:~# service apache2 restart
7. Install MySQL server and PHPMyAdmin if needed
root@raspberrypi:~# apt-get install mysql-client mysql-server php5-mysql phpmyadmin
8. Add group and user for your domain. First uid and gid is 10000 and home user (domain) directory is in /home/
root@raspberrypi:~# addgroup --gid 10000 group001
root@raspberrypi:~# adduser --home /home/mydomain.com --shell /dev/null --uid 10000 --gid 10000 --disabled-password --disabled-login --gecos '' user001
9. Create structure logs and web directory
root@raspberrypi:~# mkdir /home/mydomain.com/logs       # for Apache logs
root@raspberrypi:~# mkdir /home/mydomain.com/logs/php/  # for PHP logs
root@raspberrypi:~# mkdir /home/mydomain.com/www        # for your web page
root@raspberrypi:~# mkdir /home/mydomain.com/tmp        # for temp
root@raspberrypi:~# mkdir /home/mydomain.com/sessions   # for sessions
root@raspberrypi:~# chown -R user001:group001 /home/mydomain.com/
10. Add php-fpm.conf for your mydomain.com and edit mydomain.com.conf
root@raspberrypi:~# cp /etc/php5/fpm/pool.d/www.conf /etc/php5/fpm/pool.d/mydomain.com.conf
root@raspberrypi:~# nano /etc/php5/fpm/pool.d/mydomain.com.conf
11. Modify /etc/php5/fpm/pool.d/mydomain.com.conf
; pool name ('www' here)
[mydomain.com]
...
; Unix user/group of processes
user = user001
group = group001
...
; The address on which to accept FastCGI requests.
listen = /var/run/php5-fpm-mydomain.com.sock
...
; Set permissions for unix socket, if one is used. In Linux, read/write
listen.owner = user001
listen.group = group001
listen.mode = 0666
...
; Default Value: nothing is defined by default except the values in php.ini ...
; add php.ini admin values
php_admin_value[sendmail_path] = /usr/sbin/sendmail -t -i -f noreply@mydomain.com
php_flag[display_errors] = off
php_admin_value[error_log] = /home/mydomain.com/logs/php/fpm-php.www.log
php_admin_flag[log_errors] = on
php_admin_value[upload_tmp_dir] = /home/mydomain.com/tmp
php_admin_value[session.save_path] = /home/mydomain.com/sessions
php_admin_value[open_basedir] = /home/mydomain.com/www:/home/mydomain.com/tmp:/home/mydomain.com/sessions
php_admin_value[mail.log] = /home/mydomain.com/logs/mail.log
php_admin_value[memory_limit] = 64M
php_admin_value[post_max_size] = 18M
php_admin_value[max_execution_time] = 60
php_admin_value[allow_url_fopen] = Off
php_admin_value[upload_max_filesize] = 18M
php_admin_value[date.timezone] = Europe/Prague
12. Create Apache virtual host
root@raspberrypi:~# nano /etc/apache2/sites-available/mydomain.com.conf
# eliminate www
<VirtualHost *:80>
    ServerName www.mydomain.com
    Redirect 301 / http://mydomain.com/
</VirtualHost>

<VirtualHost *:80>
        ServerAdmin iam@mydomain.com

        ServerName mydomain.com

        DocumentRoot /home/mydomain.com/www

        <Directory /home/mydomain.com/www>
                Options -Indexes -FollowSymLinks -MultiViews
                AllowOverride All

                Order allow,deny
                allow from all
        </Directory>

        # eliminate log warning about ico
        Redirect 404 /favicon.ico
        <Location /favicon.ico>
                ErrorDocument 404 "No favicon"
        </Location>

        # *.php3-5 file extension (enable different extensions in /etc/php5/fpm/pool.d/mydomain.com.conf first)
        <FilesMatch ".+\.ph(p[345]?|t|tml)$">
                SetHandler application/x-httpd-php
        </FilesMatch>

        # FastCGI
        Action application/x-httpd-php /php5-fcgi
        Alias /php5-fcgi /usr/lib/cgi-bin/mydomain.com
        FastCgiExternalServer /usr/lib/cgi-bin/mydomain.com -socket /var/run/php5-fpm-mydomain.com.sock -pass-header Authorization

        # apache logs
        ErrorLog /home/mydomain.com/logs/error.log
        LogLevel warn
        CustomLog /home/mydomain.com/logs/access.log combined

</VirtualHost>
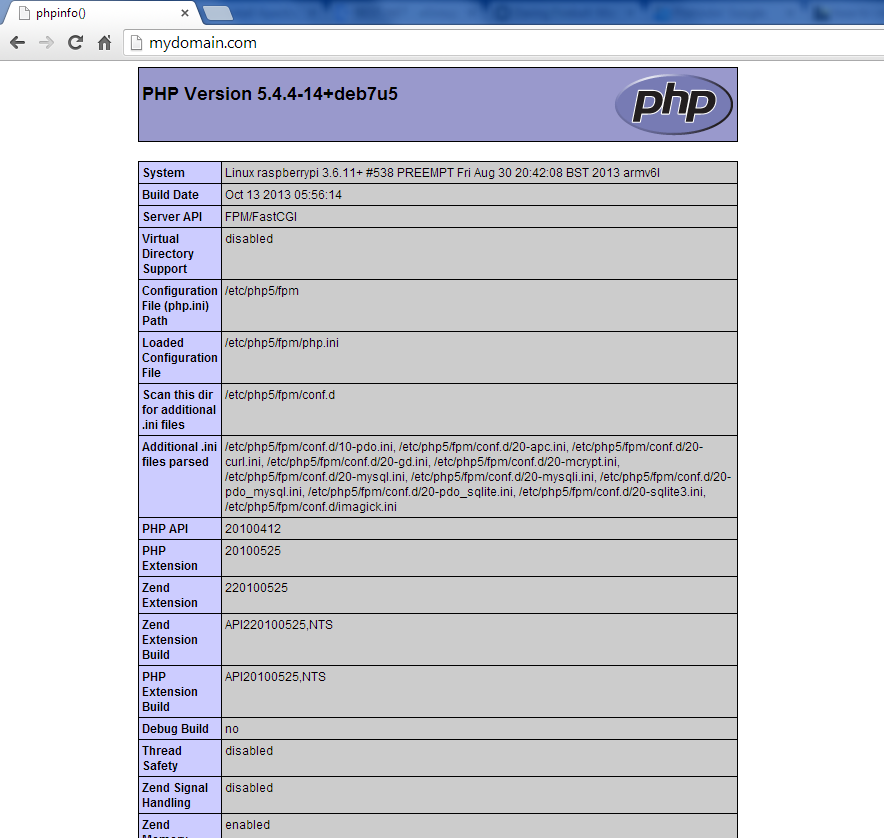
13. Create index.php file in your web home directory and insert phpinfo function into this file
root@raspberrypi:~# nano /home/mydomain.com/www/index.php
<?php phpinfo();?>
14. Create vhost symlink from sites-available to sites-enabled directory and restart apache and php5-fpm
root@raspberrypi:~# ln -s /etc/apache2/sites-available/mydomain.com.conf /etc/apache2/sites-enabled/
root@raspberrypi:~# service apache2 restart && service php5-fpm restart
[ ok ] Restarting web server: apache2 ... waiting .
[ ok ] Restarting PHP5 FastCGI Process Manager: php5-fpm.
15. Enjoy!
